To attract our users’ attention and increase engagement, we at Stormotion create communication touchpoints — push notifications. This article provides an example of how we apply cross-platform remote push notifications to our React Native applications with a simple server written in Node.js.
🧰 Prerequisites
To be able to implement a full-cycle push notification process, you’ll need:
- Your React Native application.
- A physical device. Unfortunately, remote push notifications don’t work on emulators.
- An active Firebase project (you can follow this link to create a new project).
- Docker (recommended for the server).
You can find the complete source code in our GitHub repository
to create a new project).
📱 Setting Up a React Native Application
Setup
As was mentioned above, you need to have an active Firebase project.
First, add Firebase to your React Native application using React Native Firebase documentation and configure it for the Android app. You can skip the iOS setup since we’re using a different tool (Apple Push Notifications service) for Apple devices. To look at the APNs implementation process, you can check the “Setting Up Node.js Server” section).
If your project uses different Firebase modules (like Dynamic Links for Passwordless Authentication), don’t forget to set it up for the iOS application.
We give links to official instructions and installation guides that are used in this project (and try to avoid their duplication in this article) as it guarantees that all steps are up-to-date. Besides, you can join discussions or search issues if something is going wrong during the development.
Make sure you configured everything properly (you should have already added the google-services.json file into the android/app directory and modified build.gradle files).
To repress and consume local and remote push notifications, we are going to use the react-native-push-notification library. Since we develop both iOS and Android applications, we should also add the @react-native-community/push-notification-ios library to our project:
(if you use TypeScript in your project)
To configure push notifications for the iOS application, you can simply follow the library’s installation instructions. Respectively you can use this instruction to set up the react-native-push-notification library for Android. Additionally, you can take a look at Android app configurations listed in Firebase Cloud Messaging documentatio to have the most recent updates.
Notes.
- When you update AndroidManifest.xml don’t forget to set the value as "true" at the "meta-data" tag com.dieam.reactnativepushnotification.notification_foreground to enable pop-up for in foreground on receiving remote notifications:
- We recommend using Firebase Android BoM to manage library versions compatibility. You can additionally enable Google Analytics to generate message delivery reports right in the Firebase console. However, it’s not essential.
Modify the android/app/build.gradle file:
- It is a good practice to set a default notification icon and color. Android uses these values whenever incoming messages do not explicitly set icon or color. For a better understanding, you can take a look at Android Developers documentation on how to create a notification icon.
Creating a library
Finally, we have finished the setup step. Now, we can configure our app to interact with remote push notifications.
Let’s clarify all the steps we should take so that the app can receive push notifications:
- The main step is requesting user permission before trying to receive notifications. We can skip it for the Android app, but for the iOS app, it is mandatory.
- We need to know the device registration token. We can find it in the react-native-push-notification library, and then save this token for our device into the database. You can think of it as an email address or a phone number that the device generates on its own. It can change for some reason, that’s why it’s reasonable to manage it not only remotely, but locally as well — so you can update the back-end database.
The device registration token serves as an address of the user’s device. This address takes the form of a device token unique to both the device and your app. At the launching stage, your app communicates with APNs or FCM and receives its device token. You can find out more about it following Apple and React Native Firebase documentation.
So, if we send a notification to the device’s token and it’s valid, then a device should receive it without any problems.
- Manage channels (Android only). Starting from Android 8.0 (API level 26), all notifications must be assigned to a channel (Android Developers documentation.
- Initialize and manage push notifications receiving state.
For these steps, we created a library - @stormotion/react-native-push-notifications-setup. You can find the source code here or use the You can find the source code package itself in your project as a dependency. It is a simple wrapper around the react-native-push-notification library.
We are going to use methods and hooks from this package to configure notifications in our project.
Applying Configuration to the React Native App
Our sample application fetches articles from the server and displays them as a list. If the user selects one of them and clicks on it, the new screen with the full article is opened. Our goal is to receive push notifications on updates, and immediately open the full article by clicking on the notification. Check the Node.js Server Part below for the articles API endpoint.
We are going to skip some parts of the code. You can find a full app code in the repository.
So, we have prepared our application using the @react-navigation/native library as navigation. It has 2 screens: the main one displays the list of the articles, the second one renders the article as a markdown and has a collapsing cover photo.
app/App.tsx
We also added screens component (you can check them in the repository):
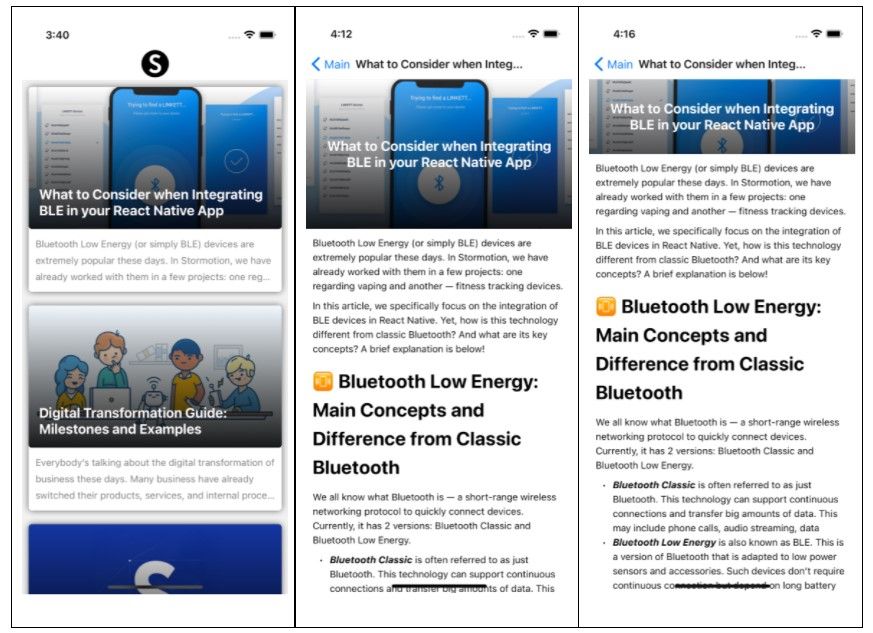
Screens components
Before configuring push notifications, we need to declare the function that will open the Article screen with the incoming content (the article’s ID that is sent to the notification’s body).
Since we configure it within the "index.js" file, we cannot use the "useNavigation" hook that is provided by the @react-navigation/native library (the following error occurs if one tries to do it: “React Hook useNavigation is called in function onNotification that is neither a React function component nor a custom React Hook function").
To get around this problem, we will follow the @react-navigation/native library documentation (we recommend reading this thoroughly as it gives all necessary notes about the next code).
Let’s create a helper file navigation.ts in the app/src/utils directory to handle there the next code:
Modify the App.tsx file:
src/utils/pushNotifications.ts:
Now, let’s configure notifications in our app.
Articles that are displayed in our demo application can have either Tech or Development category. That’s why we will establish 2 channels for them.
And now, we can specify options to configure notifications:
app/src/utils/pushNotifications.ts
app/index.js
To add "useInitNotifications" hook and use "enableNotifications" function from our library in our project, we need to declare "DeviceTokenCallbacks" functions — API requests to save and delete tokens. Since our demo application doesn’t have the user registration, we will store the token depending on the device ID in our database (we can find out the unique device ID using the react-native-device-info library).
app/src/utils/api.ts
Now, we can integrate functions from our library into the application workflow. Usually, users can turn on/off notifications in the app settings. Since our application is just a demo and doesn’t have the Settings Screen, we are going to ask for permission at the Main Screen at the app launching stage using the pop-up method.
We will do it in 10 seconds after the app launches so as to leave the app enough time to load information and give a user some time to get acquainted with the content.
src/screens/Main.tsx
In case the user wants to turn on notifications in the Settings and permissions weren’t granted, you can provide a function that opens a corresponding alert window as a parameter:
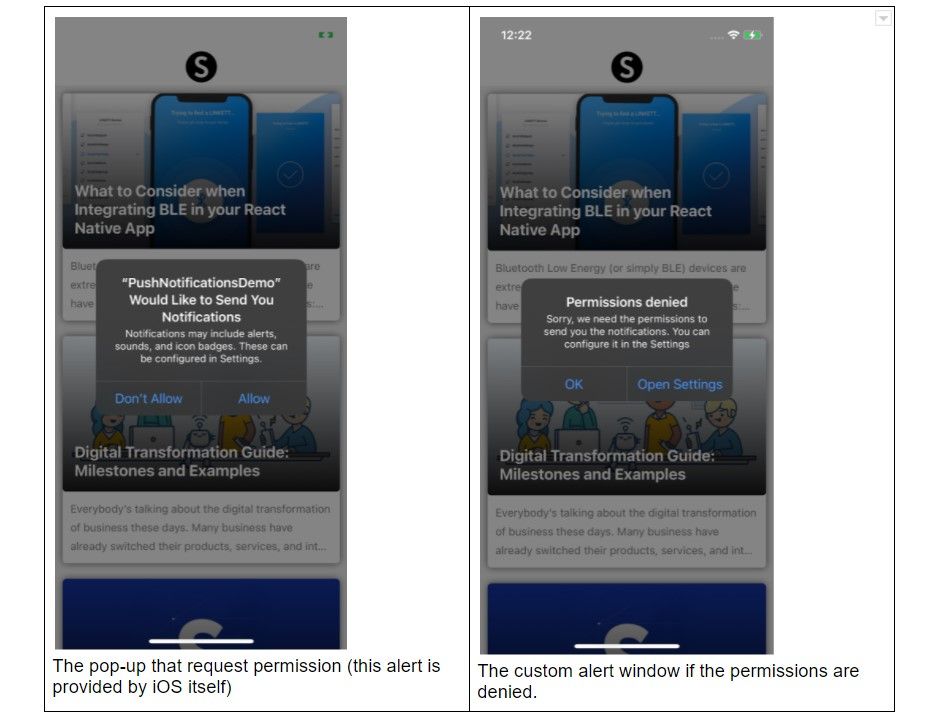
Pop-up that asks for permission & alers if permossions were denied
We have created the "useIntiNotifications" hook in the library to synchronize notifications permissions with the phone settings. Now, we can call it in the "src/navigation/RootNavigator.tsx" file.
Additionally, we need to create the custom hook to call the "syncNotifications" function, and execute this hook in the app/src/navigation/RootNavigator.tsx file.
app/src/navigation/RootNavigator.tsx
initializeProps should be declared in app/src/utils/pushNotifications.ts file:
Congratulations! Now, your app can receive and handle push notifications! But we have not made anything to send them yet. It’s time to start the server implementation.
🛠️ Setting Up Node.js Server
For this part, we have set up a starter project for Node.js with Express and PostgreSQL. The main goal is to show how to configure the node-pushnotifications library, and this part is mainly universal for different Node.js frameworks.
Note. To run the server, you need to install Docker. If you want to use it in the development mode, run docker-compose -f docker-compose-local.yml up -d && yarn dev. To run it in production, you need to specify environment variables for the PostgreSQL database and the server (respectively, you need to modify the "knexfile.js") and run docker-compose up -d.
This server has two endpoints: articles and tokens. We use them in our app to fetch data from the database. Since we don’t have the form to create new articles in our app, we will use Postman for this purpose. Returning to notifications, we want to send them every time a new article is posted. As mentioned earlier, we will do it using the node-pushnotifications library:
As this library documentation states, we need to know some sensitive information (Firebase Server Key for Android devices and APNs token for iOS ones). Let’s begin with the Firebase Server Key.
Obtaining Firebase Server Key
- Go to Firebase Console and choose your project.
- Click the gear icon in the top left and select Project settings.
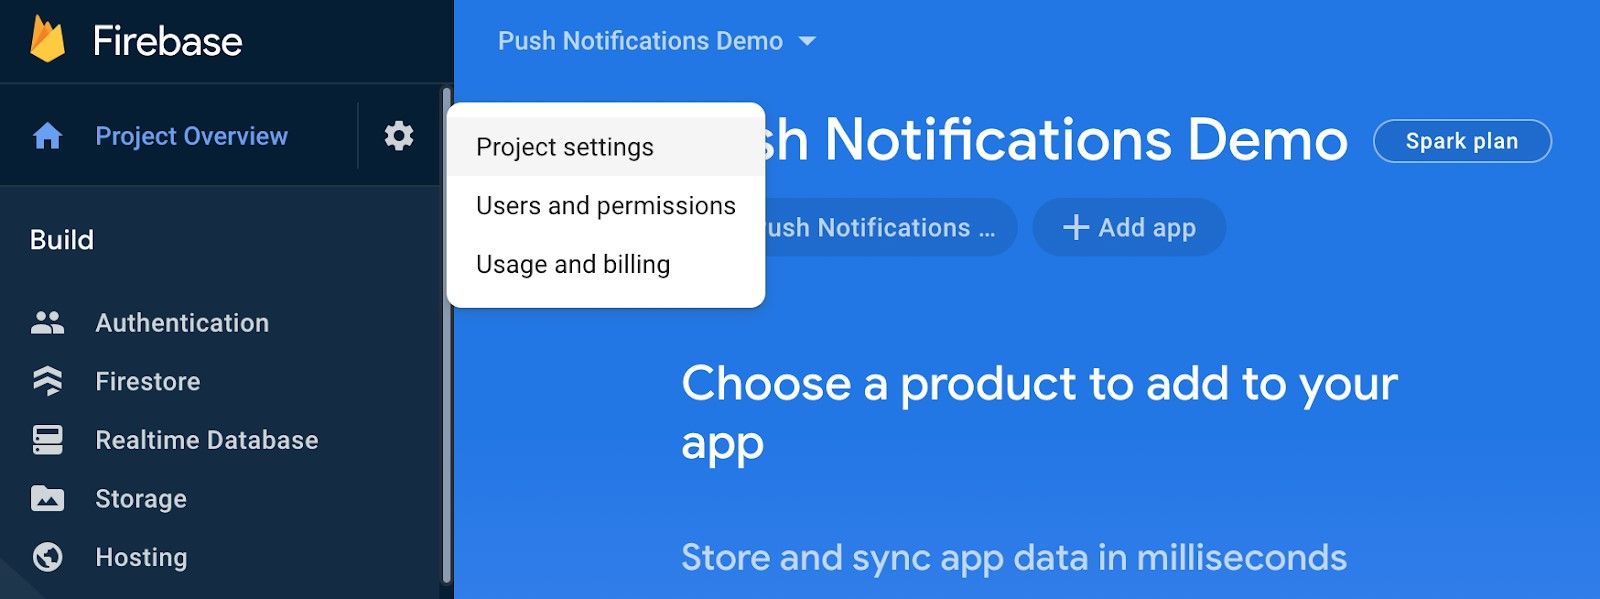
Firebase Server Key Obtaining (Shots from Firebase)
- Select Cloud Messaging tab, copy Server key and save it as a "FIREBASE_SERVER_KEY" environment variable in your project.
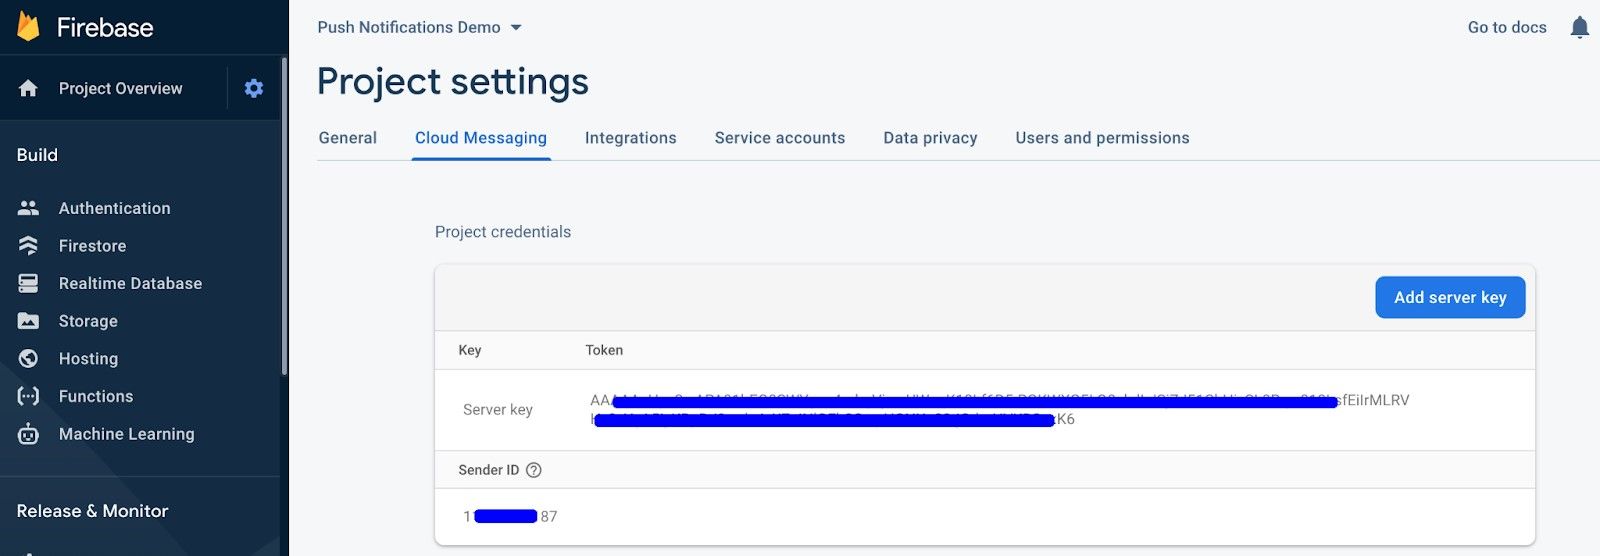
Firebase Server Key Obtaining (Shots from Firebase)
Implementing Apple Push Notifications service
To get the APNs token, we need to open Keys tab on the Apple Developer page.
- You need to create a new key with Apple Push Notifications service enabled. But be careful — One key is used for all of your apps.
If this key has already been created, you need to use it. There is a limit for these keys (2 is maximum, the second one can be used if you need to revoke the first one).

New Key Registering
- Select Continue and you will see the next screen. Now, you can click Register.

- Click Download only if you have the ability to save the key in a safe place and only members of your team will have access to it. Save Key Id as an "APN_TOKEN_KEY_ID" environment variable in your project.

- Additionally, on the Developer Account page, find the Team Id (the top right corner) and save it to environment variables too.
Configuring Push Notification
Now, we can configure the node-pushnotifications library. For any additional notes, feel free to read its documentation.
To use the APNs token, save it as an environment variable (convert it to Base64 at first) and then place it decoded.
Step-by-step:
- Convert your file to Base64 (you can do it using the terminal/cmd or surf the Internet for online services).
- Save the result as "APN_TOKEN_KEY".
- We will decode it in the code.
Now, we are going to create the pushNotifications.ts file in the src/utils directory to configure push notifications sending.
We don’t add category field to the message options as it causes trouble to open the received notification.
src/utils/env.ts:
Finally, we can add sending notifications regarding the article publishing:
src/routes/articles.ts:
If you want to learn more about the capabilities of React Native, you can read about how we handled several protocols of BLE devices in the React Native fitness app.
💡 Final Results
Woohoo! You’re all set for sending notifications. Let’s create a new article and post it using Postman. Keep the phone beside you so as not to miss the first notification 🤗
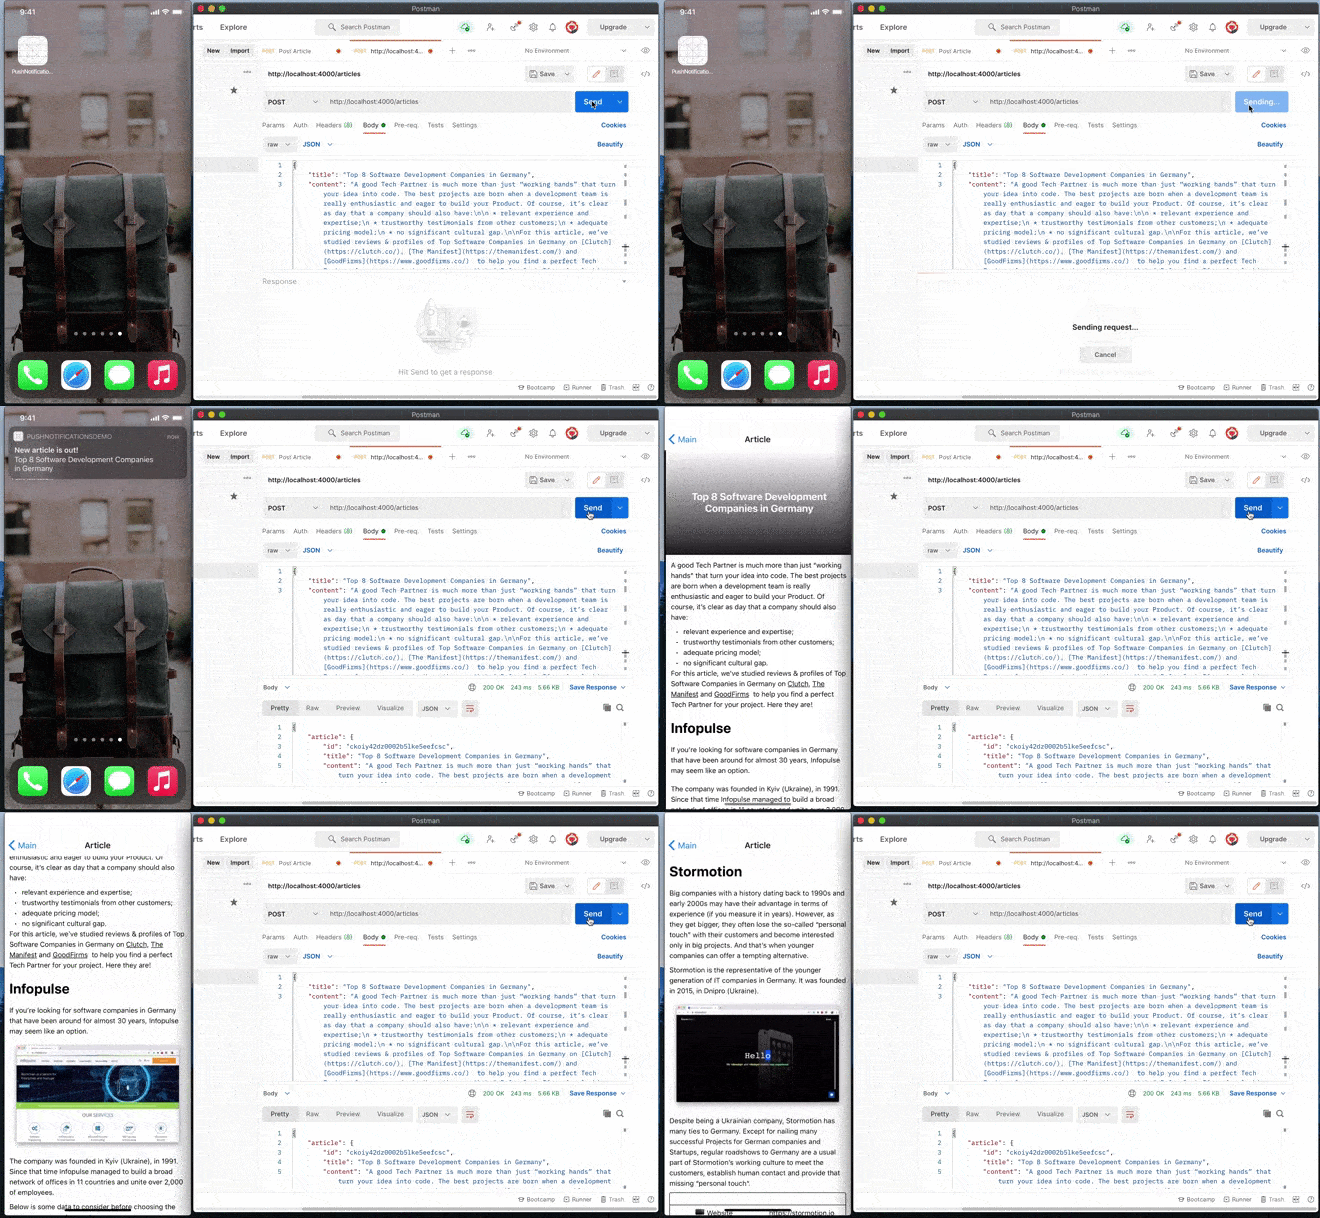
Receiving a fully functional push notification
We hope we were able to help you. In case you need further help from React Native app development company or have any questions, feel free to reach out to us!

![Stormotion client Max Scheidlock, Product Manager from [object Object]](/static/33294af91c38256bcd5a780ddc41861a/b0e74/max.png)
