Key Takeaways:
- BLE is not the same as classic Bluetooth. We use it for low-power devices like fitness trackers and health monitors that don't need a constant connection but just short bursts of data.
- There are two main libraries for BLE in React Native – react-native-ble-plx and react-native-ble-manager. They cover the core features, but ble-manager gives you a few extras: device bonding and getting a list of connected peripherals.
- Before you write a single line of code, understand GATT. It's the framework that defines how BLE devices talk to each other through Profiles, Services, and Characteristics. If you skip this step, you'll make debugging much harder later.
- Permissions are a real problem, especially on Android. Starting from Android API 23, apps need geolocation enabled just to scan for nearby BLE devices even if location isn't what your app is about.
- Testing tools will save you a lot of time. Apps like nRF Connect and BLE Scanner let you inspect BLE devices directly, so you can verify data before blaming your code.
- Keep your code organized from day one. Separate the general connection logic (scanning, connecting) from the device-specific logic (reading characteristics, handling notifications). It's a small effort that pays off as the project grows.
Bluetooth Low Energy (or simply BLE) devices are extremely popular these days. We, as a BLE app development company, have already worked on a few projects involving BLE devices, such as one regarding vaping and another focused on fitness tracking devices.
In this article, we will specifically focus on the React Native BLE integration. However, how is this technology different from classic Bluetooth? And what are its key concepts? A brief explanation is below!
📳 Bluetooth Low Energy: The Main Concepts and Difference from Classic Bluetooth
We all know what Bluetooth is. It's a short-range wireless networking protocol that quickly connects devices. Currently, it has 2 versions: Bluetooth Classic and Bluetooth Low Energy.
- Bluetooth Classic is more known as just Bluetooth. This technology can support continuous connections and transfer big amounts of data. This might include phone calls, audio streaming, and data.
- Bluetooth Low Energy , also known as BLE, incorporates a BLE stack optimized for low power sensors and accessories. This is a version of Bluetooth that is adapted to low power sensors and accessories. Such devices, often used in IoT prototypes due to their long battery life capabilities, don’t require continuous connection. They are especially popular in the fitness, healthcare, security, home entertainment industries, and beacons.
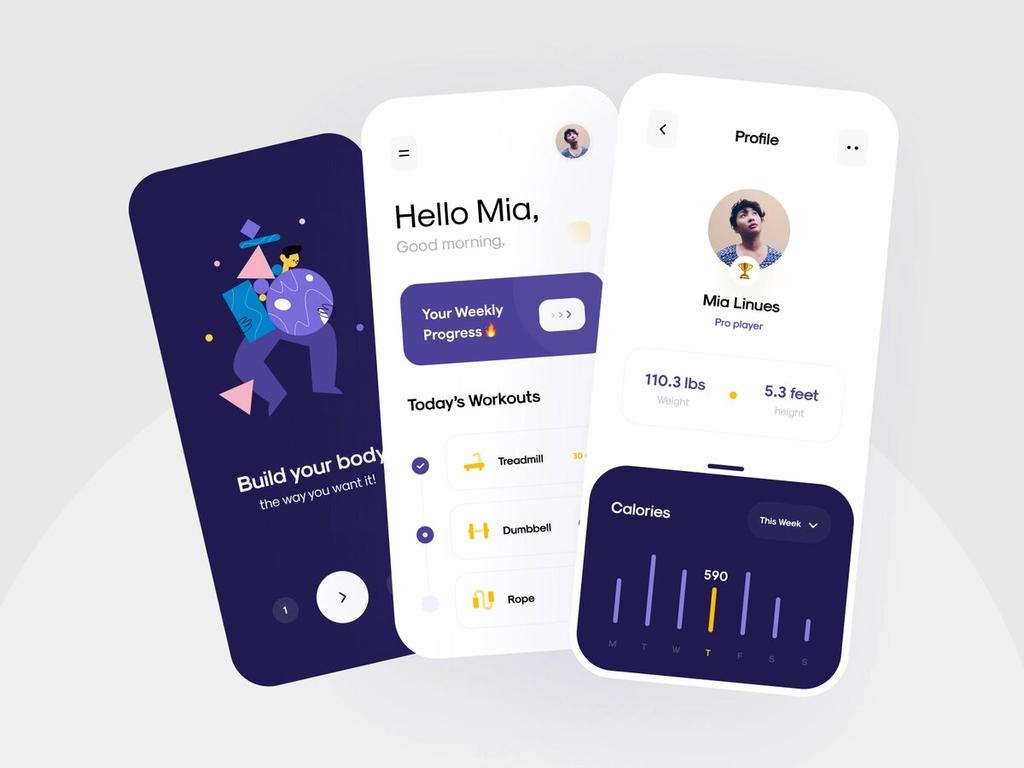
Read also our guide on how to integrate BLE-Based Fitness Devices into your App.
What are the main terms you need to know when working with this technology? Check below!
Key Concepts for BLE 📖
Before diving into BLE React Native integration for companion mobile app development, it’s important to know how this technology works. We won’t focus on that too much but will still review some key concepts.
GATT stands for Generic Attribute Profile that defines how BLE devices transfer data. To make data transfer possible, devices should have a dedicated connection.
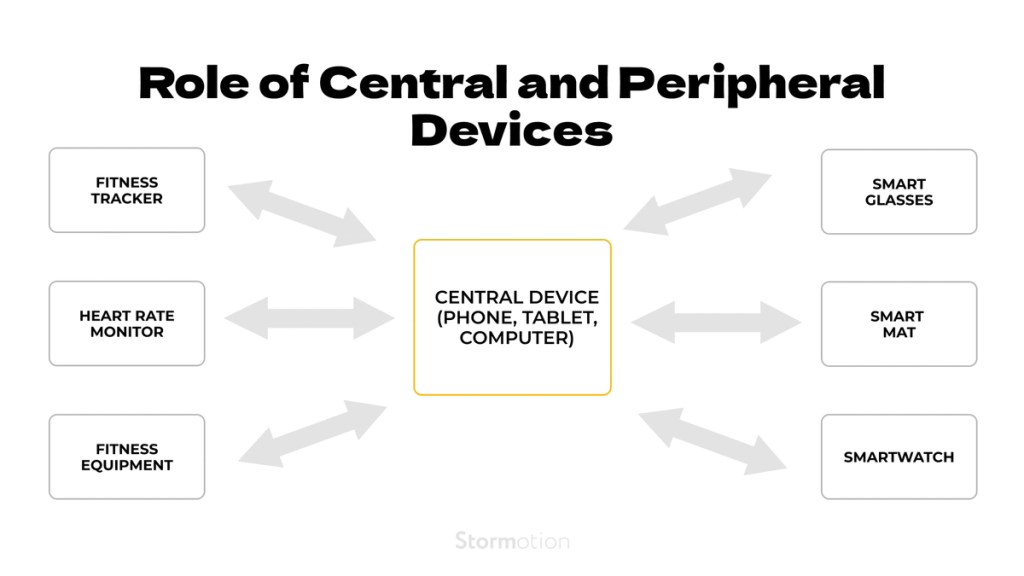
BLE devices are often referred to as peripheral devices, while smartphones, tablets, and other similar gadgets as central devices. Every specific BLE device, referred to as a peripheral device, can have an exclusive connection with one central device at a time, while the central device can be simultaneously connected to multiple other peripherals:
Since we’re talking about GATT, let’s take a closer look at the server/client relationship:
- From that perspective, the peripheral device is known as the GATT Server that contains data.
- The central device, designed to automatically connect to peripherals, acts as the GATT Client that sends requests to the server.
The Client initiates all the transactions by asking the Server, which could also be a remote device, for data. There are 2 ways to transfer data from the Server to the Client: Notifications and Indications.
- Notification is a one-way message. It's faster since it doesn’t ask the Client whether they've received the message.
- Indication describes the system of two-way communication. The Server sends a message, and in response, ➡️ the Client receives the message and sends a confirmation message back to the Server ➡️ thus, the Server knows that the initial message has reached the Client.
Data transfer itself is based on a few high-level objects: Profiles, Services, and Characteristics.
- Profile is a predefined set of Services.
- Services break up data into logic blocks that consist of Characteristics.
- Characteristic is a single data point, including an array of related data like X/Y/Z values from a 3-axis accelerometer.
Here's an example of how it may look for a fitness tracking device:
You can read a bit more on GATT, Profiles, Services and Characteristics here, and on Notifications & Indications – here.
Nevertheless, let’s get back to today's main topic!
⚙️ 2 Main Libraries for BLE Integration in React Native
As of March 2026, there are 2 libraries that can be used for Bluetooth Low Energy React Native integration:
- react-native-ble-plx
- react-native-ble-manager
❗️ Important note: this article is based on v.7.3.0 of react-native-ble-manager and v.2.0 of react-native-ble-plx
Let’s take a closer look!
🛠 react-native-ble-plx
GitHub | Documentation | Wiki
React Native BLE PLX is one of the 2 libraries you can use to work with this technology. It supports all the key features:
- observing the adapter state of the device’s Bluetooth, which is crucial for enabling functionalities like a scan button;
- connecting to discovered peripherals;
- scanning for nearby BLE devices;
- discovering services;
- discovering, reading and writing characteristics;
- observing indications & notifications;
- negotiating MTU;
- reading RSSI;
- working in background mode on iOS;
- turning on the Bluetooth adapter of the device.
Yet, the library doesn’t support the following features:
- peripheral support that enables the communication between phones through BLE;
- creating bonds with peripheral devices;
- working with Bluetooth Classic devices.
The new (2.x) version of the library supports all the latest RN versions starting from 0.60. However, you can still use the old version of the library even up to 0.60.5 RN version, but with additional changes.
As for OS versions, the library works on iOS 9+ and Android API 19+.
⚒ react-native-ble-manager
This library offers an alternative for BLE mobile app development and integrating BLE in React Native applications.
Despite the absence of an explicit features list, we have identified the key BLE functionality based on method names. It includes all the features react-native-ble-plx has and a few additional ones such as:
- bonding peripherals;
- requesting connection priority;
- getting connected & bonding peripherals.
For a practical BLE use case in urban transportation, explore how to build an e-scooter app.
The latest version of the BLE manager React Native library supports RN 0.60 and newer. However, the older version of the library can be used with older RN versions:
- React Native 0.40-0.59 is supported until 6.7.X
- React Native 0.30-0.39 is supported until 2.4.3
As for OS versions, this library covers iOS 8+ and Android API 18+.
⚖ react-native-ble-plx vs react-native-ble-manager Comparison
We’ve also made a few comparison tables to cover the main differences between the two libraries:
A closer examination of features reveals that, by importing ble-manager, developers gain access to additional possibilities:
Finally, we can also compare some GitHub stats:
You can find even more smaller details on react-native-ble-plx here, and on react-native-ble-manager here.
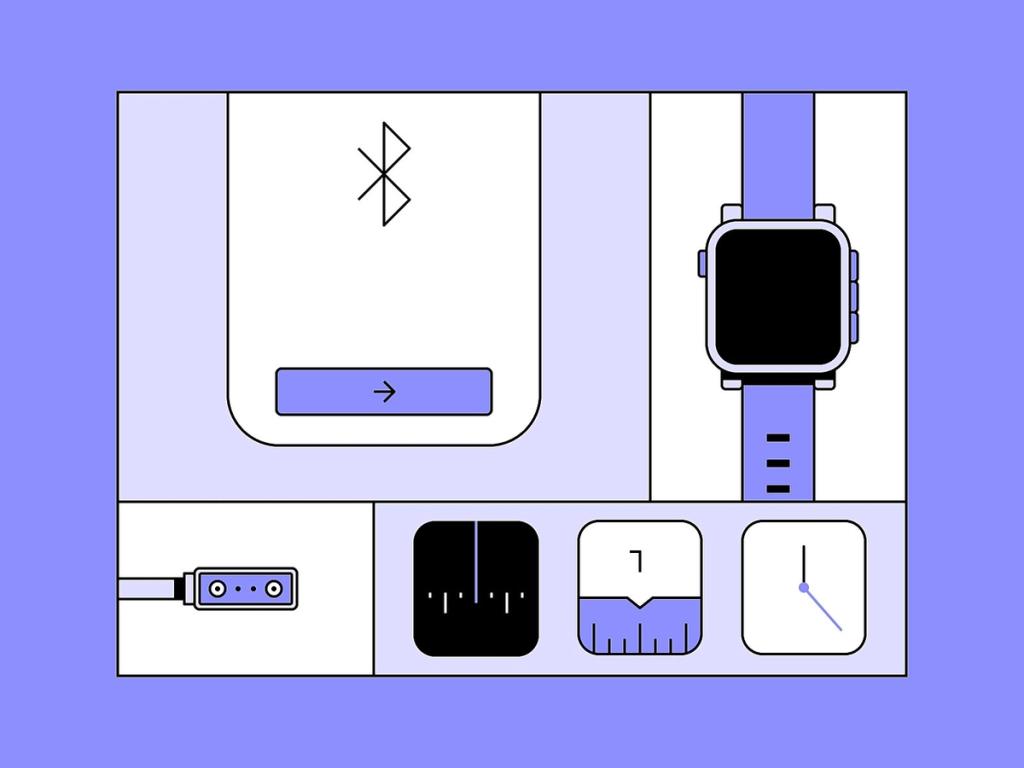
✅ Apps to Test BLE Devices
When developing a mobile appication for BLE integration, such as in fitness tracker app development, it’s crucial to test how it will function with compatible devices. Our team used the following apps:
- nRF Connect for Mobile
- BLE Scanner
These tools are quite similar and provide many options to test different features of Bluetooth Low Energy devices.
For developers working across multiple protocols, understanding BLE vs ANT+ can guide effective testing strategies for diverse device ecosystems.
🤓 BLE and React Native Integration Guide
This guide is designed to walk you through the seamless integration of BLE into your React Native mobile applications using the react-native-ble-manager library. It is based on the 11.3.1 version of react-native-ble-manager (which is the most popular in February 2026).
Whether you aim to develop a fitness app that monitors health devices or controls smart home gadgets, or needs to communicate with other BLE-equipped devices, this guide will provide you with a solid foundation. We'll start by guiding you through the installation process of the react-native-ble-manager for both Android and iOS platforms, ensuring you have a smooth setup experience. Given the intricacies of BLE technology and the diverse ecosystem of devices, a thorough understanding of the installation process is crucial for avoiding common pitfalls.
Following the setup, we delve into practical examples and detailed explanations of the library's main methods—such as initializing the manager, scanning for peripherals, discovering services, connecting to devices, and retrieving services.
Install
The library support the react native autolink feature.
npm:
npm i --save react-native-ble-managerYarn:
yarn add react-native-ble-managerTo use BLE in your app, you need to set specific permissions.
Android
Update your manifest file.
// file: android/app/src/main/AndroidManifest.xml
<!-- Add xmlns:tools -->
<manifest xmlns:android="http://schemas.android.com/apk/res/android"
    xmlns:tools="http://schemas.android.com/tools"
    package="YOUR_PACKAGE_NAME">

    <!--
      HACK: this permission should not be needed on android 12+ devices anymore,
      but in fact some manufacturers still need it for BLE to properly work :
      https://stackoverflow.com/a/72370969
    -->
    <uses-permission android:name="android.permission.BLUETOOTH" tools:remove="android:maxSdkVersion" />
    <!--
      should normally only be needed on android < 12 if you want to:
      - activate bluetooth programmatically
      - discover local BLE devices
      see: https://developer.android.com/guide/topics/connectivity/bluetooth/permissions#discover-local-devices.
      Same as above, may still be wrongly needed by some manufacturers on android 12+.
     -->
    <uses-permission android:name="android.permission.BLUETOOTH_ADMIN" tools:remove="android:maxSdkVersion" />

    <uses-permission android:name="android.permission.ACCESS_COARSE_LOCATION" android:maxSdkVersion="28"/>
    <uses-permission-sdk-23 android:name="android.permission.ACCESS_FINE_LOCATION" android:maxSdkVersion="30"/>
    <!-- Only when targeting Android 12 or higher -->
    <!--
      Please make sure you read the following documentation
      to have a better understanding of the new permissions.
      https://developer.android.com/guide/topics/connectivity/bluetooth/permissions#assert-never-for-location
    -->

    <!-- Needed if your app search for Bluetooth devices. -->
     <!--
      If your app doesn't use Bluetooth scan results to derive physical location information,
      you can strongly assert that your app doesn't derive physical location.
    -->
    <uses-permission android:name="android.permission.BLUETOOTH_SCAN"
                     android:usesPermissionFlags="neverForLocation" />
    <!-- Needed if you want to interact with a BLE device. -->
    <uses-permission android:name="android.permission.BLUETOOTH_CONNECT" />
    <!-- Needed if your app makes the current device discoverable to other Bluetooth devices. -->
    <uses-permission android:name="android.permission.BLUETOOTH_ADVERTISE" />
…
If you need communication while the app is not in the foreground you need the ACCESS_BACKGROUND_LOCATION permission.
For more information, refer to the official documentation.
Runtime permissions must also be requested from users using PermissionsAndroid, check the example.
iOS
Update the Info.plist file.
In iOS >= 13 you need to add the NSBluetoothAlwaysUsageDescription string key.
If the deployment target is earlier than iOS 13, you also need to add the NSBluetoothPeripheralUsageDescription string key.
For background use you need to add central-peripheral in UIBackgroundModes key. Refer to the documentation.
Usage (main methods)
Start(options)
The library must be initialized before use through the start method. This can be done at the launch of the application or just before the actual use of BLE.
BleManager.start({ showAlert: false }).then(() => {
  // Success code
  console.log("Module initialized");
});
scan(serviceUUIDs, seconds, allowDuplicates, scanningOptions)
Scan for available peripherals.
BleManager.scan([], 5, true).then(() => {
  // Success code
  console.log("Scan started");
});
Discover peripheral (event)
The scanning find a new peripheral.
bleManagerEmitter.addListener("BleManagerDiscoverPeripheral", (args) => {
  // The id: args.id
  // The name: args.name
});
connect(peripheralId, options)
Attempts to connect to a peripheral. In many case if you can’t connect you have to scan for the peripheral before.
BleManager.connect("XXXXXXXX-XXXX-XXXX-XXXX-XXXXXXXXXXXX")
  .then(() => {
    // Success code
    console.log("Connected");
  })
  .catch((error) => {
    // Failure code
    console.log(error);
  });
retrieveServices(peripheralI, serviceUUIDs])
Retrieve the peripheral’s services and characteristics.
BleManager.retrieveServices("XXXXXXXX-XXXX-XXXX-XXXX-XXXXXXXXXXXX").then(
  (peripheralInfo) => {
    // Success code
    console.log("Peripheral info:", peripheralInfo);
  }
);
We described install instructions and main methods of react-native-ble-manager which are needed for most use cases.
To view the parameters of each listed method or other methods (like start notifications, read and write) and events (like receive notifications), consult this documentation.
⚠️ Possible Pitfalls when Integrating BLE Devices
During BLE integration, our developers identified several pitfalls, including IoT security issues and solutions, and the underutilization of event listeners, which can streamline the handling of BLE events and make the development process smoother and potentially increase the IoT software development cost. Here are our recommendations on how you can make the development go smoother.
# 1: Turn on geolocation 🌍
If you’re developing an Android application, this one will be important. As written in this documentation: “Starting from Android API 23+, to access the hardware identifiers of nearby external devices via Bluetooth and Wi-Fi scans, your app must now have the geolocation enabled”.
To check whether the geolocation is enabled and turn it on in case it isn't, which is crucial for accessing the hardware identifiers (such as the device identifier) of nearby external devices via Bluetooth, we recommend using the react-native-android-location-enabler library.
# 2: Turn on Bluetooth 📳
Obviously, you need to turn on Bluetooth on the mobile device before scanning. For this purpose you may use the methods of the mentioned libraries:
Another common challenge with Android BLE connection is managing background connectivity, as Android devices impose restrictions on scanning and maintaining persistent BLE connections.
# 3: Change device name 📱
When using react-native-ble-plx, you may stumble upon a bug which will prevent you from being able to change the device name. That can happen in case the name is cached. This issue is tracked here.
# 4: Keep code quality high 🏆
Based on more than 8 years of experience in custom React Native app development services, we have a few general tips to improve the code quality:
- Keep all of the characteristics, UUID services, and relevant modules in one centralized location for better management.
- Avoid magic numbers in characteristics. Instead, use constants.
- Organize the logic structure into 2 separate container files:
- one file to keep the logic that contains code that isn't related to communication with a specific device (e.g. scanning process, connection, disconnection);
- another file for the code that contains communication with a specific device — discovering services/characteristics, observing notifications/indications, reading/writing characteristics, etc.
When integrating BLE into a React Native app, reviewing our Web Bluetooth demo can provide valuable insights.
Got questions about integrating React Native BLE? We'll help clarify everything for you! Send us a message and we'll solve your problem.